
Resistance Band Strength Training Exercises are a fantastic way to kickstart your fitness journey, especially if you’re new to working out.
These exercises, using simple yet versatile resistance bands, offer a gentle introduction to building strength and toning muscles.
Whether you’re aiming to lose weight, gain muscle, or simply improve your overall fitness, resistance band exercises are your go-to solution.
With our beginner-friendly guide, you’ll discover 30 resistance band strength training exercises that will help you get stronger, fitter, and more confident on your path to better health.
Let’s jump in and explore the wonderful world of resistance band workouts together!
How Resistance Band Strength Training Exercises Helps with Weight Loss?
Resistance band strength training is a fantastic way to lose weight, especially if you’re a beginner.
These bands are so versatile and that too it offers many benefits and incredibly effective ways to lose weight and build muscle, and here’s why.
When you engage in cardiovascular exercises, you burn most of the calories than strength training but as you done your cardio session, calorie burning also stops, which is obvious.
But, when you engage in strength training exercises, you burn calories after the workout also. It’s like strength training makes you a calorie burning machine.
It is because when you engage in strength training you build muscle or muscular mass, and these muscles are metabolically active.
So, it is like the more muscles you have the more your body burns calories, even when you’re resting on your couch or watching TV.
Another major benefit of barbell strength training is the afterburn effect, scientifically known as excess post-exercise oxygen consumption (EPOC).
After a vigorous resistance band workout, your body continues to burn calories at an elevated rate for hours, sometimes even up to 24 hours.
This calorie burn helps in shedding those extra pounds more effectively than traditional cardio exercises.
So, if you’re ready to break those fats and build up a toned physique, let’s dive into some killer resistance band strength training exercises.
Ready to get started? Let’s begin with the exercises.
Below there are numerous resistance band strength training exercises divided into each body part; the only means to create this list is to find those exercises which fit perfect for you.
Let me explain, each person is different and so talking on that note you must pick only those exercises which help you in better gains.
Let’s take an example, when doing biceps curls, I feel mind muscle connection in the dumbbell curls and my workout buddy feels in the barbell curls.
Try each exercise like this week you perform biceps curls with dumbbells and on next try with resistance band and find which helps you in better pump and mind muscle connection.
Best Resistance Band Strength Training Exercises
CHEST
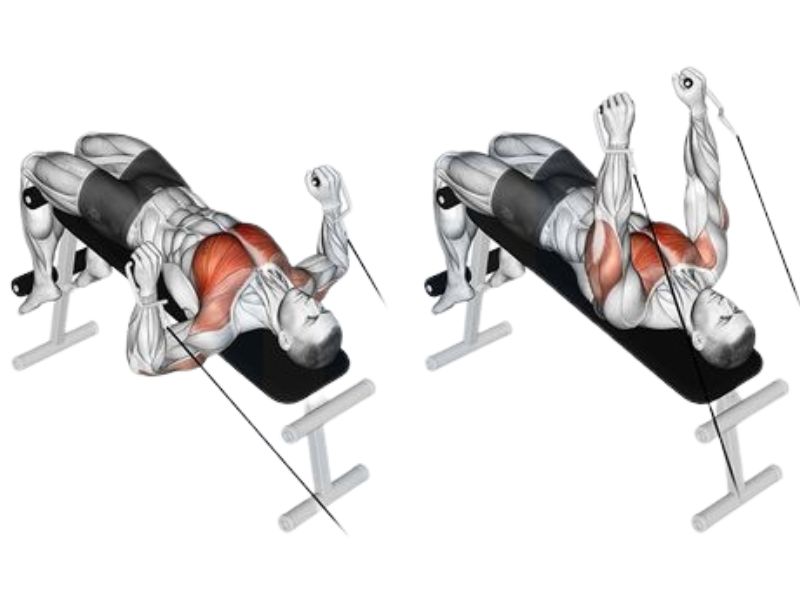
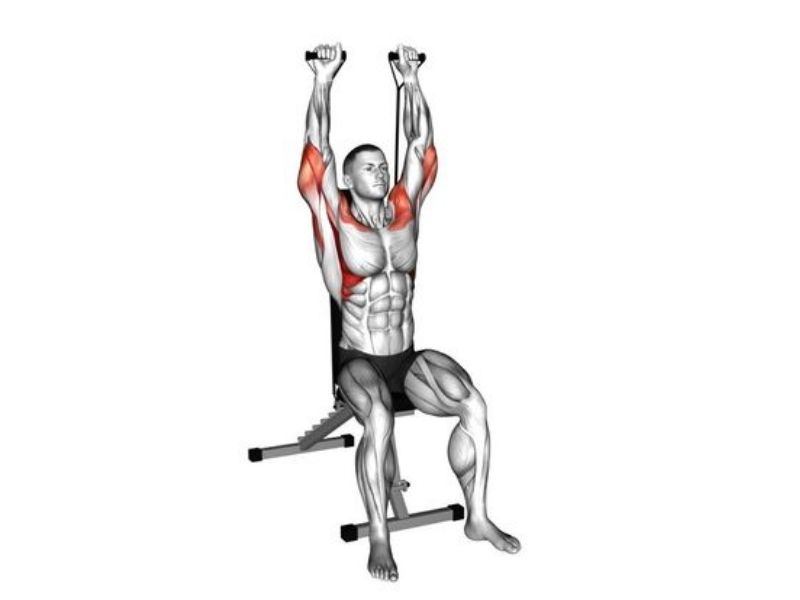
1. Resistance Band Incline Chest Press:

Steps:
- Attach the resistance band to a secure low point behind you (e.g., squat rack bar).
- Lie on an inclined bench with your feet flat on the floor.
- Grab the handles/ends of the band with a neutral grip (palms facing each other).
- Press the bands upwards in a controlled motion, as if performing a regular bench press.
- Lower the bands slowly back to the starting position.
Common Challenge: Bands slipping or needing to provide more resistance.
Expert Tip: Ensure the band is securely anchored and adjust the angle or tension for sufficient resistance without compromising form.
2. Resistance Band Incline Chest Fly:
Steps:
- Similar setup to the incline press (above).
- Start with your arms extended and wide open, with a slight bend at the elbows.
- Squeeze your chest muscles to bring your hands together in a controlled arc above your chest.
- Resist the band’s pull as you slowly return your arms to the starting position.
Common Challenge: Overstretching at the bottom, risking shoulder injury.
Expert Tip: To maintain tension and protect joints, keep the movement controlled, and don’t let your hands go lower than your shoulders.
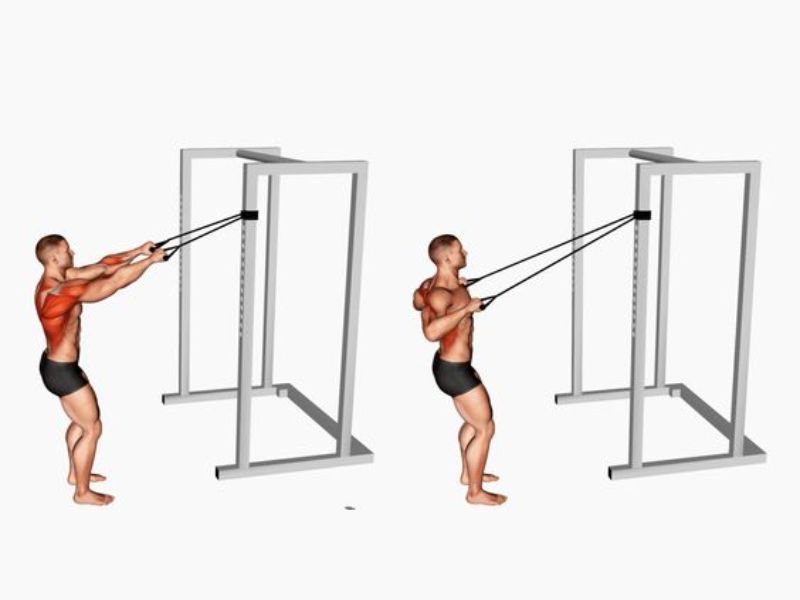
3. Resistance Band Chest Press (Seated/Standing):
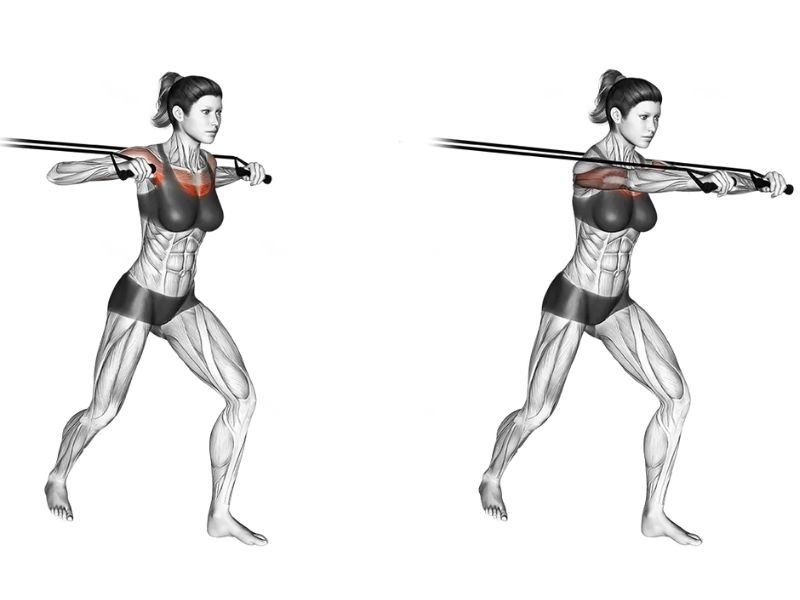
Steps:
- Anchor the resistance band at chest level behind you (e.g., door knob).
- You can perform this exercise either seated on a chair or standing.
- Hold the handles/ends of the band with a neutral grip and press forward in a controlled motion.
- Ensure full extension of your arms without locking your elbows at the top.
- Slowly return the band to the starting position.
Common Challenge: Insufficient tension leads to less effective workouts.
Expert Tip: Adjust your distance from the anchor point to increase resistance, ensuring full extension without locking elbows.
4. Resistance Band Chest Fly (Seated/Standing):
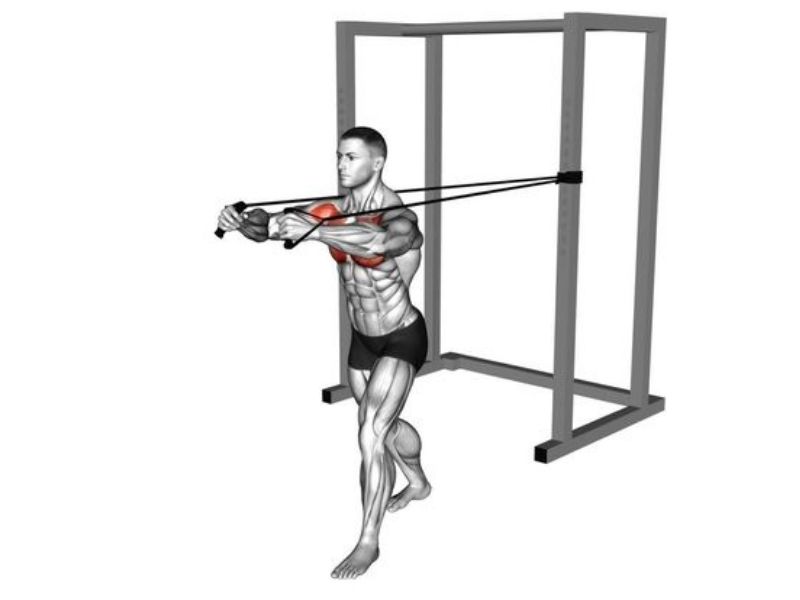
Steps:
- Similar setup to the chest press (above).
- Start with your arms extended and wide open.
- Squeeze your chest muscles to bring your hands together in a controlled arc in front of your chest, maintaining slight tension on the band throughout.
- Imagine squeezing a pencil between your pecs at the peak of the movement.
- Slowly return your arms back to the starting position, keeping the bands parallel.
Common Challenge: Keeping the bands parallel and at the right tension.
Expert Tip: Focus on a slow, steady motion and visualize squeezing a pencil between your pecs at the movement’s peak.
5. Resistance Band Decline Chest Press:
Steps:
- Anchor the resistance band securely above you (e.g., pull-up bar).
- Lie on a decline bench with your feet flat on the floor.
- Grab the handles/ends of the band with a neutral grip.
- Press the bands downwards in a controlled motion, focusing on your lower chest muscles.
- Ensure both sides of the band maintain equal tension throughout the movement.
- Slowly return the bands back to the starting position.
Common Challenge: Bands may provide uneven resistance.
Expert Tip: Ensure both sides are equally tense and perform the press smoothly to activate the lower chest effectively.
BACK
1. Resistance Band Rows:
Steps:
- Secure the resistance band at a low point (e.g., under a table).
- Hold the ends of the band with a neutral grip and stand with your feet shoulder-width apart.
- Keeping your core engaged and back straight, hinge at your hips and row the band towards your chest, squeezing your shoulder blades together at the top.
- Slowly lower the band back to the starting position, maintaining good posture.
Common Challenge: Maintaining posture without rounding the back.
Expert Tip: Keep your back straight and core engaged, pulling your shoulder blades together at the movement’s top.
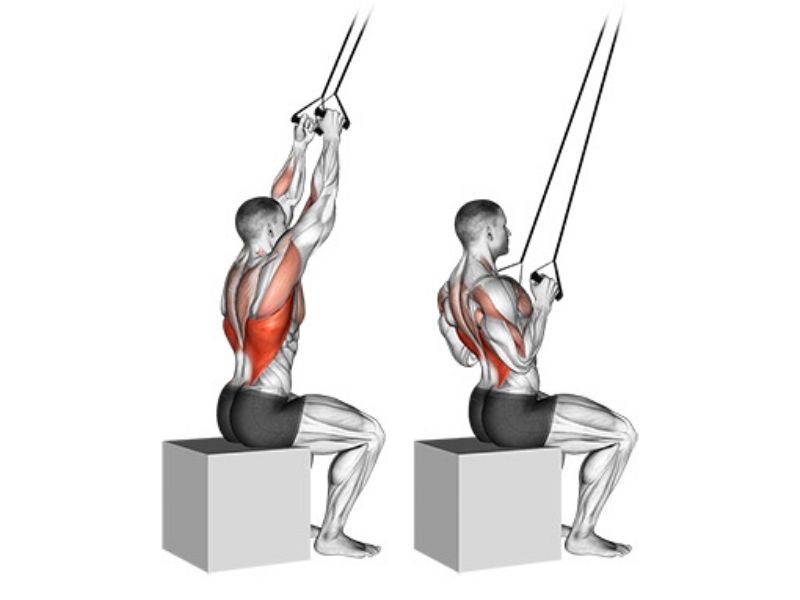
2. Resistance Band High Rows:
Steps:
- Anchor the resistance band securely above you (e.g., pull-up bar).
- Stand with your feet shoulder-width apart and grab the handles/ends of the band with a neutral grip.
- Pull the band down towards your chest with your elbows high, focusing on your upper back muscles.
- Control the movement on the way down and avoid using momentum.
- Slowly return the band back to the starting position.
Common Challenge: Too much force or speed can lead to control loss.
Expert Tip: Execute with controlled motion, focusing on the muscle contraction rather than momentum.
3. Resistance Band Seated Rows:
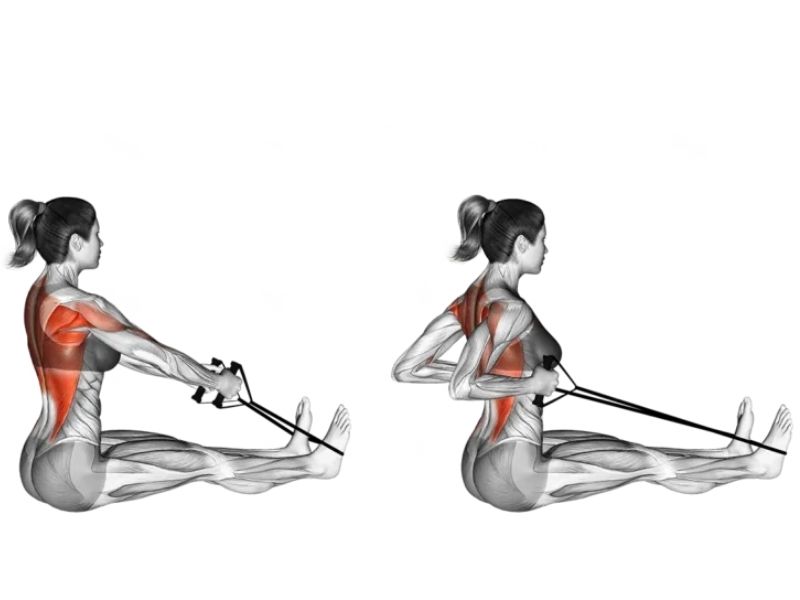
Steps:
- Sit on the floor with your legs extended in front of you.
- Loop the resistance band around your feet.
- Hold the handles/ends of the band with a neutral grip and lean back slightly, keeping your core engaged and back straight.
- Row the band towards your waist, squeezing your mid-back muscles.
- Maintain a full range of motion and avoid slouching your lower back.
- Slowly return the band back to the starting position.
Common Challenge: Slouching or rounding the lower back.
Expert Tip: Sit upright, tighten your core, and ensure a full range of motion for effective mid-back engagement.
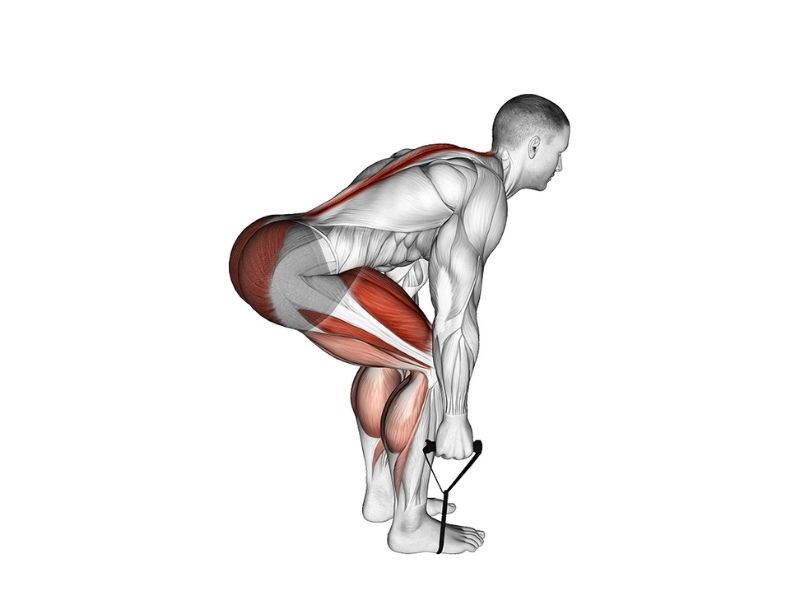
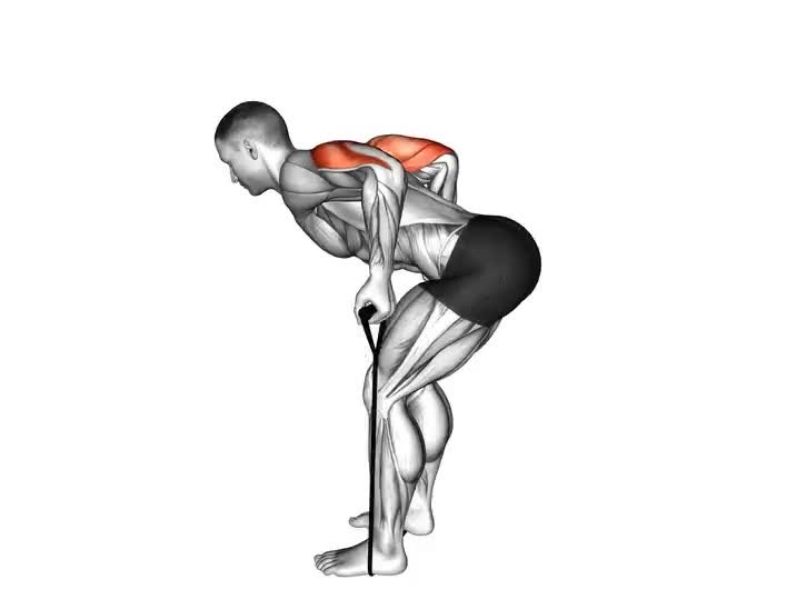
4. Resistance Band Hyperextensions:
Steps:
- Secure the resistance band under your feet (e.g., by looping it around a weight plate).
- Hold the ends of the band with an overhand grip and stand with your feet shoulder-width apart.
- Hinge at your hips and slowly lean forward from your waist, maintaining a slight arch in your lower back.
- Stop when you feel a good stretch in your lower back muscles, avoiding any hyperextension (excessive backward arching).
- Engage your core and slowly pull yourself back up to the starting position.
Common Challenge: Overextending the back at the top of the movement.
Expert Tip: Focus on a comfortable range for your back, avoiding any jerky motions.
5. Resistance Band Lat Pulldowns:
Steps:
- Secure the resistance band securely overhead (e.g., door knob with a hook attachment).
- Stand with your feet shoulder-width apart and grab the handles/ends of the band with a neutral grip.
- Keeping your core engaged and back straight, pull the band down towards your upper chest, focusing on squeezing your lat muscles (the large muscles on the sides of your back) rather than your biceps.
- Imagine your elbows moving down towards your sides for optimal lat activation.
- Slowly return the band back to the starting position.
Common Challenge: Not isolating the lats sufficiently.
Expert Tip: Keep your chest up and focus on pulling the elbows down to your sides to maximize lat engagement.
SHOULDER
1. Resistance Band Shoulder Press:
Steps:
- Stand on the middle of the resistance band with your feet shoulder-width apart.
- Hold the handles/ends of the band at shoulder height with a neutral grip.
- Press the band upwards in a controlled motion, as if performing a regular shoulder press.
- Ensure the band stays positioned throughout the movement and lower it back down slowly.
Common Challenge: Band positioning slipping during the exercise.
Expert Tip: Ensure a stable stance and consistent tension in the band throughout the movement.
2. Resistance Band Front Raise:
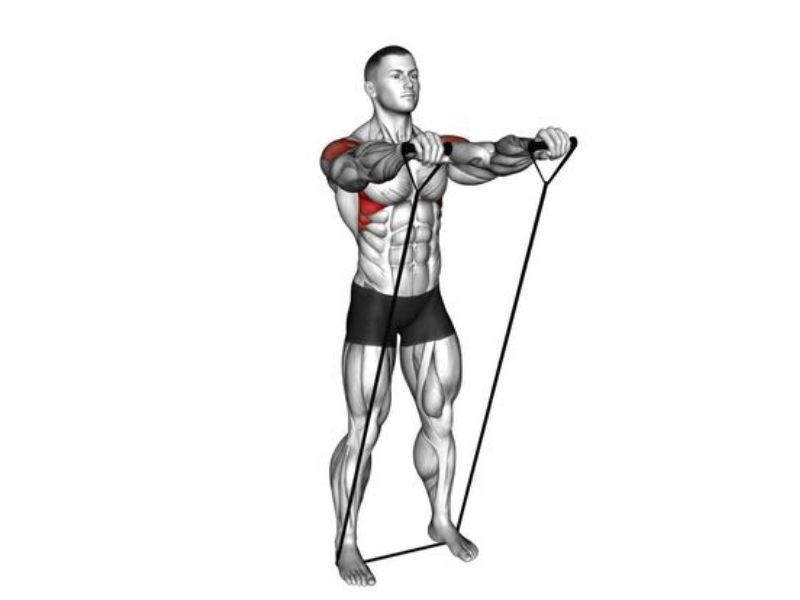
Steps:
- Stand on the middle of the resistance band with your feet shoulder-width apart.
- Hold the handles/ends of the band with a neutral grip and your arms straight down by your sides.
- Raise your arms straight out in front of you to shoulder height, resisting the band’s pull as you lower them back down with control.
Common Challenge: Maintaining control of the band, especially on the way down.
Expert Tip: Resist the band’s pull as you lower your arms to increase muscle activation.
3. Resistance Band Lateral Raise:
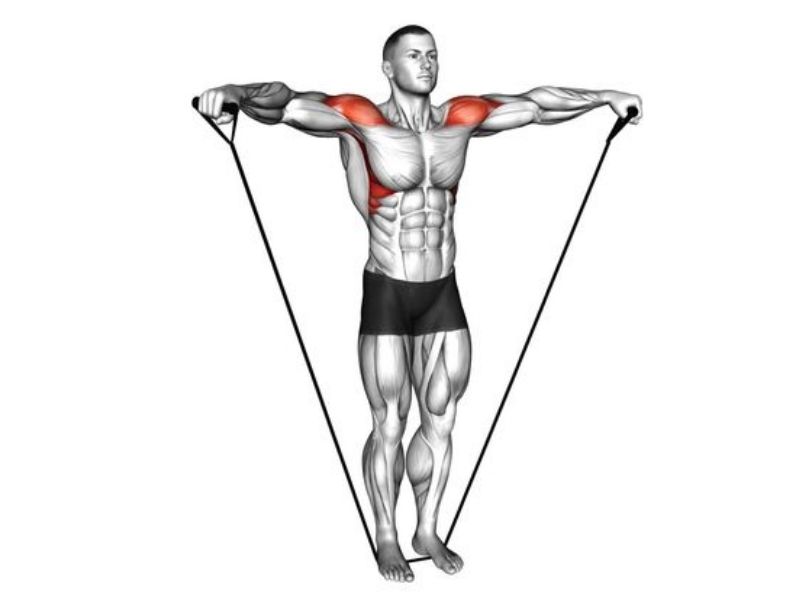
Steps:
- Stand on the middle of the resistance band with your feet shoulder-width apart.
- Hold the handles/ends of the band with a neutral grip and your arms down by your sides with a slight bend at the elbows.
- Raise your arms out to the sides with a slight bend in your elbows, focusing on using your shoulder muscles rather than swinging your arms.
- Maintain a smooth and controlled motion throughout the exercise.
Common Challenge: Keeping the motion smooth without jerking.
Expert Tip: Focus on elevating your arms using your shoulder muscles rather than your traps.
4. Resistance Band Upright Row:
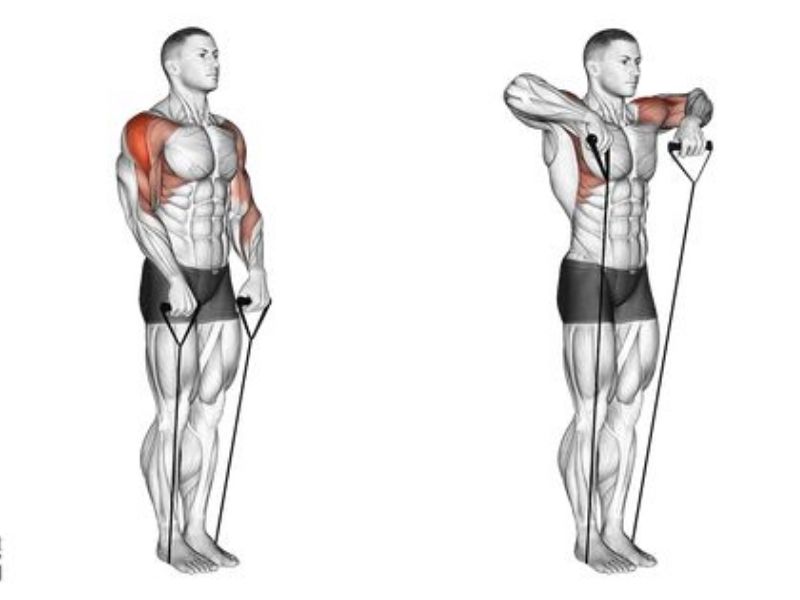
Steps:
- Stand on the middle of the resistance band with your feet shoulder-width apart.
- Hold the handles/ends of the band with a neutral grip and your arms down by your sides.
- Pull the band upwards with your elbows leading the movement, keeping them close to your body and below shoulder height.
- Avoid raising your elbows too high or shrugging your shoulders.
- Slowly lower the band back down to the starting position.
Common Challenge: Raising the elbows too high can strain the shoulders.
Expert Tip: Keep elbows below shoulder height and close to your body.
5. Resistance Band Shoulder Shrug:

Steps:
- Stand on the middle of the resistance band with your feet shoulder-width apart.
- Hold the handles/ends of the band with a neutral grip and your arms down by your sides.
- Shrug your shoulders upwards, focusing on lifting them straight up without involving your neck.
- Lower your shoulders back down slowly and with control.
Common Challenge: Involving too much neck movement.
Expert Tip: Focus on elevating your shoulders straight upwards, minimizing neck involvement for safety.
LEGS
1. Resistance Band Hamstring Kickback:
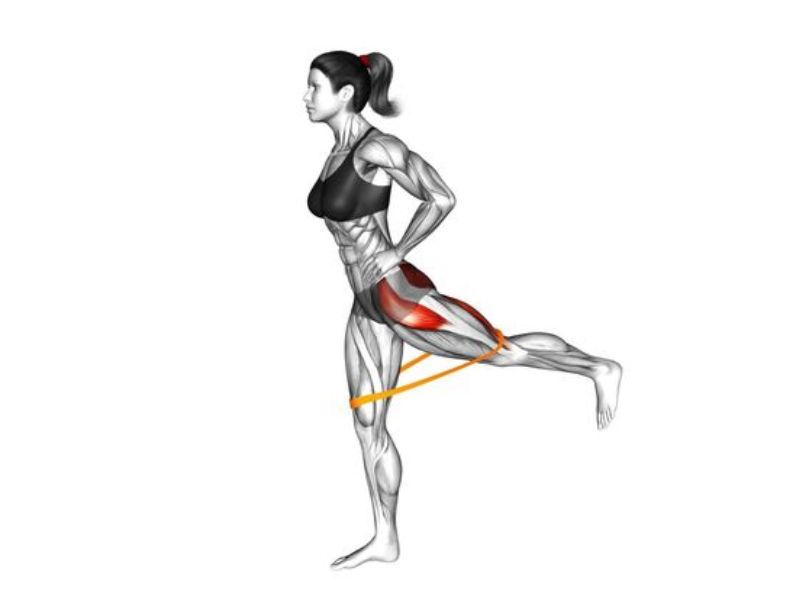
Steps:
- Attach the resistance band securely to a low anchor point (e.g., squat rack bar).
- Loop the other end of the band around your ankle.
- Stand facing the anchor point with your feet shoulder-width apart and maintain good posture.
- Keeping your core engaged and the standing leg slightly bent for stability, kick your working leg back against the band’s resistance, squeezing your glutes and hamstrings at the top of the movement.
- Slowly return your leg to the starting position with control.
Common Challenge: Not maintaining balance.
Expert Tip: Focus on a slow, controlled movement and use a wall or chair for balance if needed.
2. Resistance Band Squats:
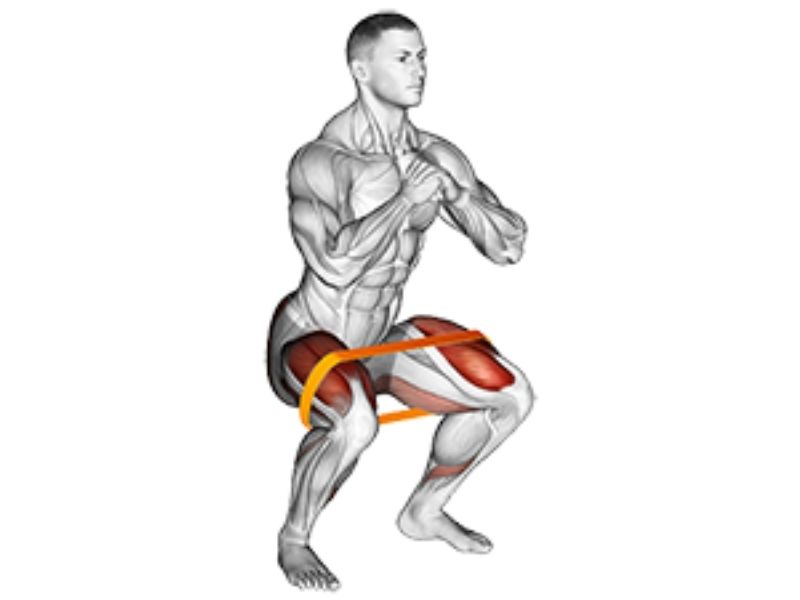
Steps:
- Stand on the resistance band with your feet shoulder-width apart.
- Hold the ends or handles of the band up at your shoulders with a neutral grip.
- Keeping your core engaged and back straight, squat down by bending your knees and hips as if you’re sitting back in a chair.
- Ensure your knees track over your toes and avoid letting them cave inward.
- Push through your heels to return to the starting position, squeezing your glutes at the top.
Common Challenge: Band positioning can shift and decrease tension.
Expert Tip: Keep the band under your feet’ arches and ensure it’s taut throughout the squat.
3. Resistance Band Lunges:
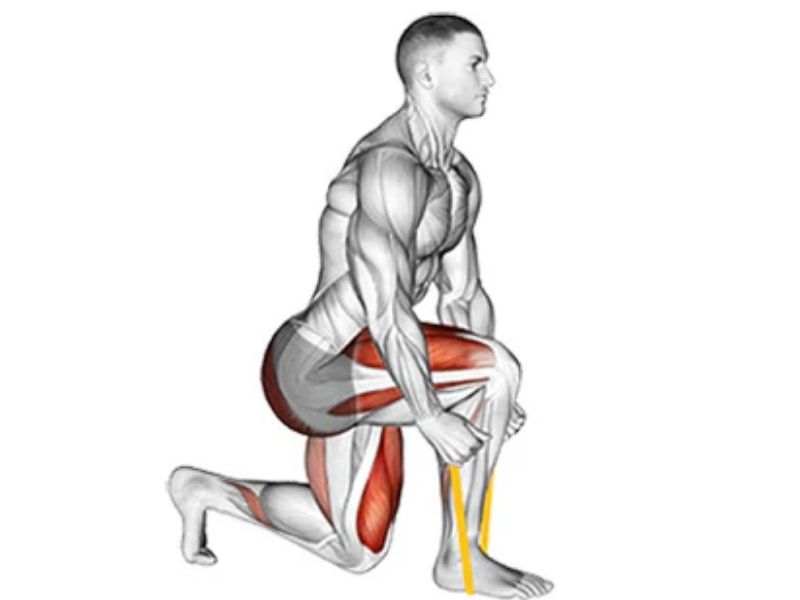
Steps:
- Loop one end of the resistance band under the instep of your back foot.
- Hold the other end of the band with both hands in front of your chest.
- Take a long step forward with your front leg, lowering your body down until both knees are bent at 90-degree angles.
- Ensure your front knee tracks over your ankle and doesn’t extend past your toes.
- Push through your front heel to drive yourself back up to the starting position, squeezing your glutes.
Common Challenge: Keeping the front knee stable.
Expert Tip: Ensure your front knee does not pass your toes and maintain a strong, upright torso.
4. Resistance Band Leg Press:
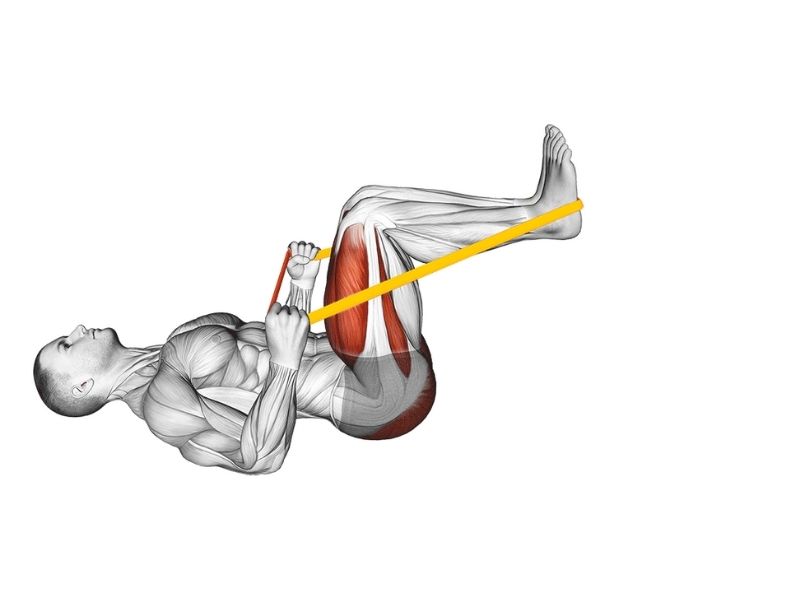
Steps:
- Lie flat on your back with your legs extended and the resistance band looped under the arches of your feet.
- Hold the ends of the band with your hands by your sides.
- Push your feet firmly into the band, extending your legs upwards until they are straight (but not locked) at the knees.
- Squeeze your glutes at the top of the movement before slowly lowering your legs back down to the starting position.
Common Challenge: Band slipping from the feet.
Expert Tip: Secure the band over your shoes for grip and extend your legs fully for maximum tension.
5. Resistance Band Bulgarian Split Squat:
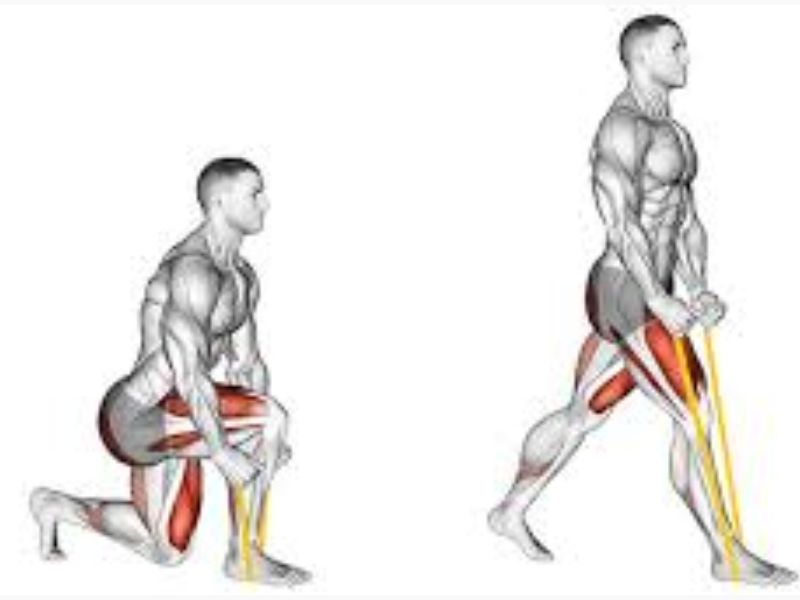
Steps:
- Stand in front of a bench or sturdy chair with your feet lunge-distance apart.
- Loop the resistance band under the instep of your front foot and place your rear foot on the bench behind you.
- Keeping your core engaged and back straight, lower your body down by bending your front knee until it reaches a 90-degree angle.
- Push through your front heel to drive yourself back up to the starting position, squeezing your glute on the working leg.
Common Challenge: Losing balance.
Expert Tip: Focus on a vertical movement of your hips and engage your core for stability.
BICEPS
1. Resistance Band Preacher Curls:
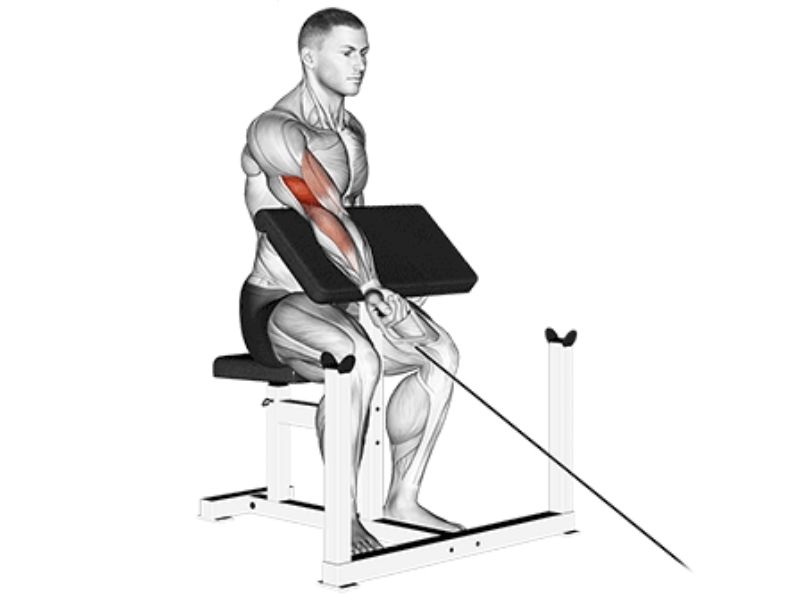
Steps:
- Anchor the resistance band securely to a low point (e.g., squat rack bar).
- Sit facing the anchor point with your knees bent and feet flat on the floor.
- Hold the ends of the band with an underhand grip (palms facing up) and position your elbows on the insides of your thighs, mimicking a preacher curl bench setup.
- Curl the band upwards towards your shoulders, squeezing your biceps at the top of the movement.
- Slowly lower the band back down with control.
Common Challenge: Elbow positioning.
Expert Tip: To mimic a preacher bench, ensure your elbows stay in contact with your knees.
2. Resistance Band Hammer Curls:
Steps:
- Stand on the middle of the resistance band with your feet shoulder-width apart.
- Hold the ends of the band with a neutral grip (palms facing each other) at your sides.
- Curl your forearms upwards, bringing the band towards your shoulders without rotating your wrists.
- Squeeze your biceps at the peak of the curl before slowly lowering your hands.
Common Challenge: Curling too fast.
Expert Tip: Maintain a controlled tempo to increase time under tension.
3. Resistance Band Concentration Curls:
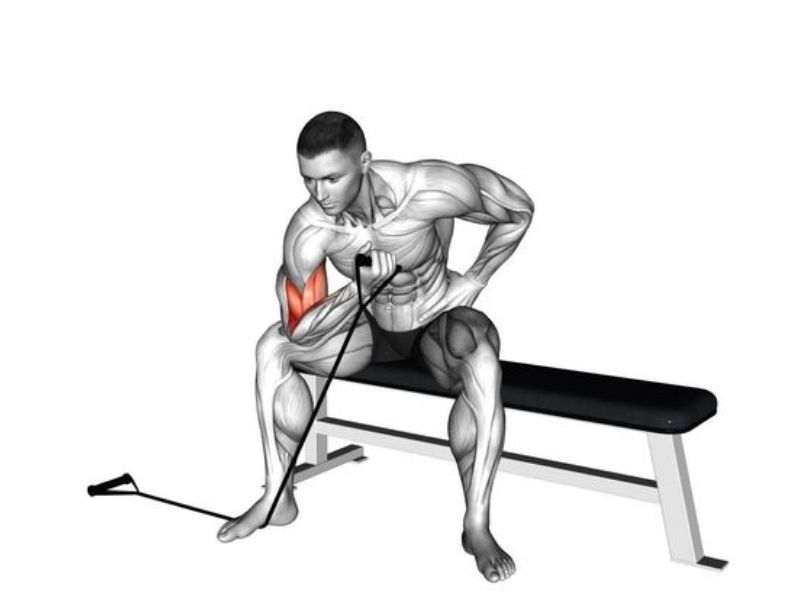
Steps:
- Sit on a chair or bench with your legs wide apart.
- Loop one end of the resistance band under the instep of one foot for stability.
- Hold the other end of the band with a neutral grip and rest your elbow on the inside of your thigh for support.
- Curl your hand upwards towards your shoulder, squeezing your bicep at the top of the movement.
- Slowly lower the band back down with control, focusing on isolating the bicep muscle.
Common Challenge: Keeping the arm isolated.
Expert Tip: Prevent your body from swaying by focusing on isolating the bicep during the curl.
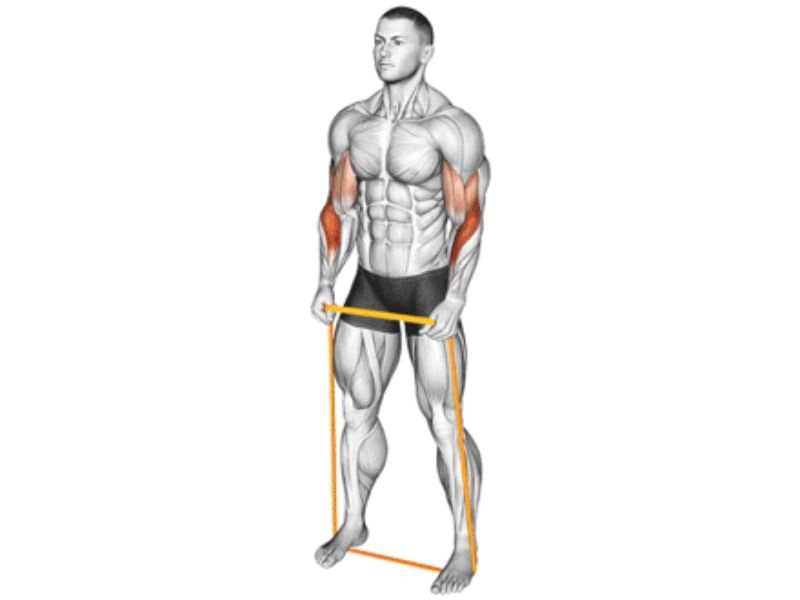
4. Resistance Band Standing Curls:
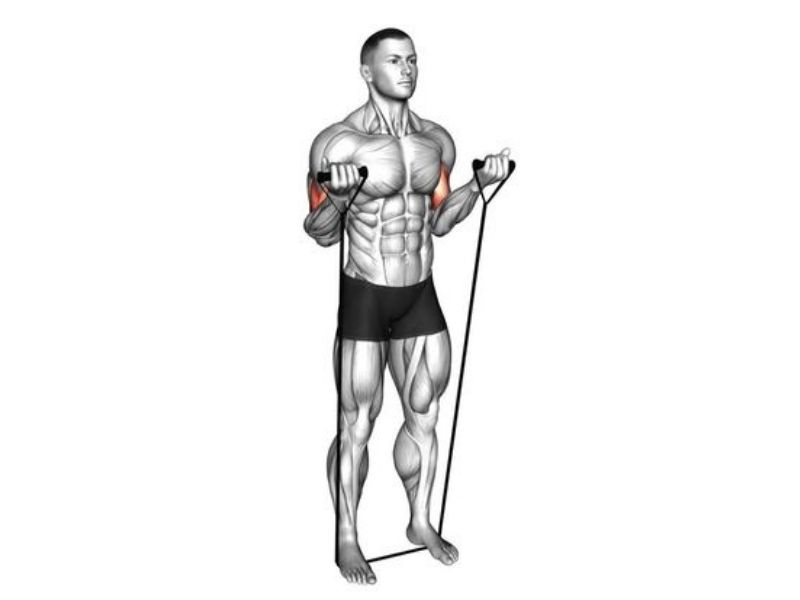
Steps:
- Stand on the middle of the resistance band with your feet shoulder-width apart.
- Hold the ends of the band with a neutral grip at your sides.
- Curl your forearms upwards, bringing the band towards your shoulders without swinging your arms.
- Squeeze your biceps at the top of the curl before slowly lowering the band back down with control.
Common Challenge: Maintaining band tension.
Expert Tip: Adjust your stance width to modify resistance and ensure constant tension throughout the movement.
5. Resistance Band Seated Curls:
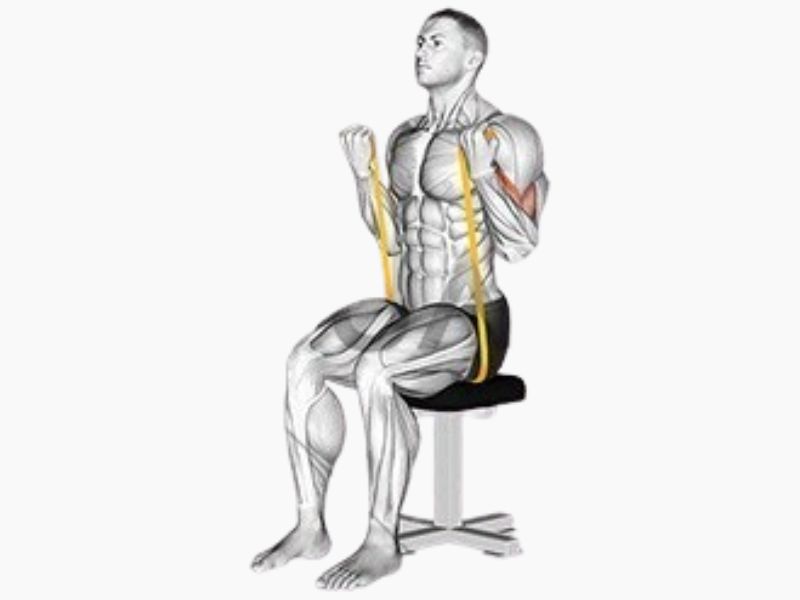
Steps:
- Sit on a chair with your feet flat on the floor and spaced shoulder-width apart.
- Loop the resistance band under the arches of your feet for stability.
- Hold the ends of the band with a neutral grip at your sides.
- Curl your forearms upwards, bringing the band towards your shoulders without swinging your arms.
- Squeeze your biceps at the top of the curl before slowly lowering the band back down with control.
Common Challenge: Band slipping.
Expert Tip: Secure the band by keeping your feet flat and spaced appropriately.
TRICEPS
1. Resistance Band Overhead Triceps Extension:
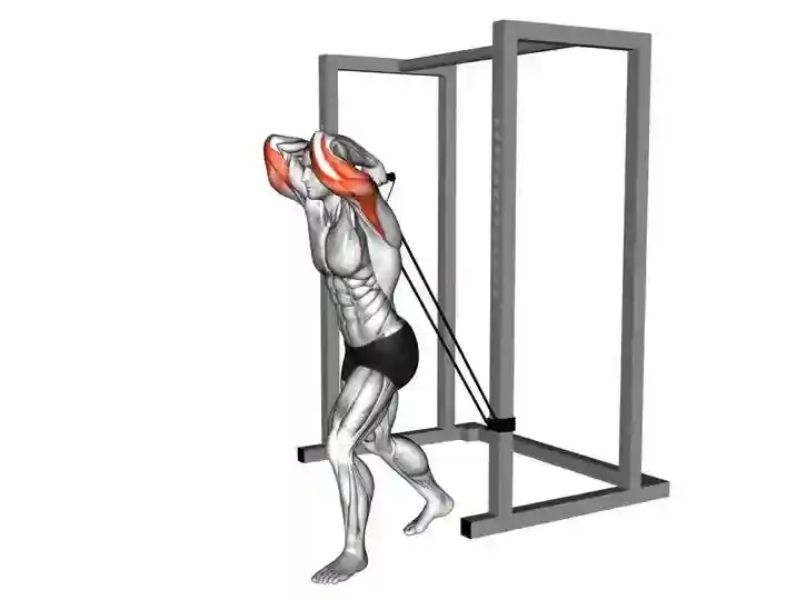
Steps:
- Stand with your feet shoulder-width apart.
- Hold the resistance band behind your back, with one end in each hand close together.
- Extend your arms overhead until they are straight (but not locked) at the elbows.
- Squeeze your triceps at the top of the movement before slowly lowering your arms back down to the starting position behind your head.
Common Challenge: Band tension decreases at the top of the movement.
Expert Tip: Keep your hands close together and fully extend your arms to maximize tension.
2. Resistance Band Skull Crushers:
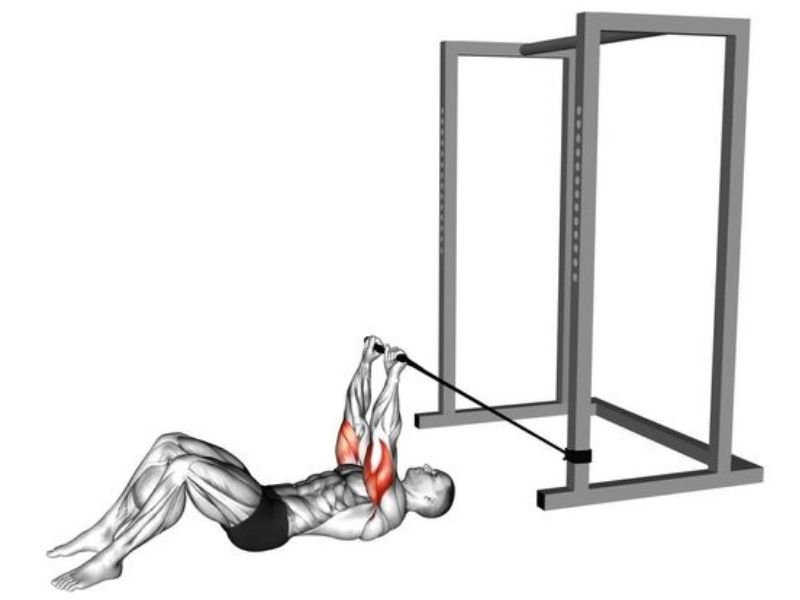
Steps:
- Lie flat on your back on a bench or exercise mat with your knees bent and feet flat on the floor.
- Anchor the resistance band securely overhead (e.g., pull-up bar).
- Hold the ends of the band with a neutral grip close to your head.
- Keeping your upper arms stationary and elbows close to your sides, extend your forearms downwards until your arms are almost straight (but not locked) at the elbows.
- Squeeze your triceps at the bottom of the movement before slowly returning your arms to the starting position.
Common Challenge: Keeping the elbows in position.
Expert Tip: Focus on moving only your forearms and keeping your elbows fixed.
3. Resistance Band Triceps Kickbacks:
Steps:
- Stand with a slight hinge at your hips and knees, forming a straight line from your head to your heels.
- Loop the resistance band under the arches of your feet for stability.
- Hold one end of the band in each hand with a neutral grip and extend one arm back straight behind you.
- Keep your upper arm stationary close to your torso and focus on extending your forearm downwards until your arm is almost straight (but not locked) at the elbow.
- Squeeze your triceps at the bottom of the movement before slowly returning your arm to the starting position.
Common Challenge: Maintaining arm position during extension.
Expert Tip: Keep your upper arm stationary; move only your forearm.
4. Resistance Band Triceps Dips:

Steps:
- Sit on a sturdy bench with the resistance band looped around your shoulders and under your arms.
- Position your hands shoulder-width apart on the edge of the bench.
- Keeping your core engaged and back straight, lower yourself down by bending your elbows until they reach a 90-degree angle.
- Squeeze your triceps at the bottom of the dip before pressing yourself back up to the starting position.
Common Challenge: Band positioning.
Expert Tip: Ensure the band is positioned comfortably across your back for added resistance without discomfort.
What are some common mistakes to avoid when using Resistance Band Strength Training Exercises?
Resistance band strength training offers a fantastic way to build strength and confidence, especially for beginners.
Whether you’re new to the gym or a seasoned lifter, avoiding these common mistakes will help you get the most out of your workouts and keep your injury-free. Let’s get in.
A. Improper Form and Technique
Every beginner is tempted to lift big dumbbells or use heavy weights on machines, often leading to injury. Lifting heavy weights without proper form is risky and can result in months or years of setbacks due to injury.
Proper form and technique in resistance band strength training exercises not only prevent injuries but also lead to better gains.
Choose weights that allow you to perform 10-12 reps with proper, controlled form.
To master proper form, start with higher reps of lower weight, empowering yourself to control the weights rather than letting the weights control you.
And gradually increase the weights.
B. Neglecting Warm-Up and Cool-Down
When at rest, muscle blood pressure is relatively low. During resistance band strength training exercises, blood pressure spikes, increasing the risk of injury.
A light cardio warm-up increases blood flow to muscles, preparing your body and reducing injury risk. Similarly, cooling down after a workout is essential.
Exercise raises heart rate and blood flow; a proper cool-down helps return these to resting levels, removes metabolic waste from muscles, and prevents blood pooling in extremities.
Including stretching in your cool-down routine can improve flexibility, reduce stiffness and soreness, enhance your range of motion, and improve overall muscle function.
Conclusion
In conclusion, resistance band strength training exercises offer a versatile and effective way to achieve weight loss, muscle gain, and overall fitness improvement.
By focusing on proper form, incorporating warm-up and cool-down routines, and staying consistent, you can maximize results while minimizing the risk of injury.
So, whether you’re a beginner or experienced fitness enthusiast, grab your resistance bands and start your journey to a healthier, stronger you today!