
Are you prepared to elevate the prowess of your dorsal muscles? If you’re embarking on a quest to forge a mightier and exquisitely chiseled back, the odyssey commences right at this juncture.
Envision a workout that not only dares to push the boundaries of your capabilities but also sculpts your back with precision and intensity finely honed for targeting.
Allow me to introduce you to the ’21 Back HIIT Workout’ – an ever-shifting amalgamation of perspiration, unyielding resolve, and tangible outcomes.
Whether you stand as a devotee of fitness or find yourself at the inception of your wellness voyage, this manual stands as your entry to a back that seizes attention effortlessly.
Let us plunge into a realm charged with pulsating vitality and unearth the revelation of how 21 minutes, 21 distinct exercises, and an unwavering version of yourself possess the potential to redefine the horizons of your back’s capabilities.
Understanding Back HIIT Workouts
Back HIIT workouts are the secret weapon to unlocking a stronger, more chiseled back while supercharging your fitness routine.
Imagine combining the heart-pounding intensity of High-Intensity Interval Training (HIIT) with the targeted focus on your back muscles. It’s like giving your back a VIP pass to the transformation it deserves.
Research backs up the effectiveness of HIIT for overall fitness gains, and when we direct this intensity toward our back muscles, the results are even more astounding.
Studies have shown that HIIT not only burns calories during the workout but also keeps your metabolism revved up for hours after, promoting fat loss and lean muscle development.
When we channel this powerful technique into back-focused exercises, we’re engaging in a precise battle plan against those stubborn love handles, or a less-defined back.
So, if you’re tired of the same old back routine or simply seeking a way to efficiently sculpt your back, Back HIIT workouts are your answer.
Benefits of Back HIIT Workouts
Back HIIT workouts are about to become your new fitness obsession. Imagine boosting your metabolism, torching calories, and sculpting your back muscles, all in one exhilarating session. It’s not just a workout; it’s a game-changer.
1. Turbocharged Fat Burning:
Research shows that High-Intensity Interval Training (HIIT) is a fat-burning powerhouse. When we apply this to our back muscles, the effect is like stoking a metabolic fire.
Studies have found that HIIT increases post-exercise calorie burn, helping you shed fat and revealing those hard-earned muscles. So, if you’re aiming for a leaner back, Back HIIT is your go-to strategy.
2. Efficient Workout in Less Time:
We get it – life is busy. But that doesn’t mean your fitness goals should take a back seat. Back HIIT workouts are your time-saving solution.
Studies like the one published in the Journal of Sports Science & Medicine highlight that even short bursts of HIIT can yield similar cardiovascular benefits to longer, steady-state workouts.
In just a fraction of the time, you can give your back muscles the attention they deserve.
3. Sculpted Back Muscles:
Back HIIT workouts target both the superficial and deep muscles of your back, creating a multi-dimensional impact.
The American Council on Exercise (ACE) points out that HIIT engages multiple muscle groups simultaneously, leading to comprehensive muscle development. Get ready to unlock a sculpted, toned back that demands attention.
4. Elevated Post-Exercise Oxygen Consumption (EPOC):
EPOC, or the “afterburn effect,” is the phenomenon where your body continues to burn calories even after the workout.
A study published in the International Journal of Exercise Science states that HIIT increases EPOC, contributing to greater energy expenditure. With Back HIIT, your back muscles keep working even when you’re done sweating.
5. Improved Cardiovascular Health:
Your heart will thank you for embracing Back HIIT. Research published in the British Journal of Sports Medicine highlights that HIIT improves cardiovascular health by increasing aerobic capacity and enhancing overall heart function.
Not only will you sculpt your back, but you’ll also elevate your heart health.
Warm-Up Routine
The warm-up phase serves as the vital initial step in ensuring a safe and efficient commencement of your Back HIIT workout.
By priming your muscles and joints, you not only minimize the risk of injury but also optimize your performance during the upcoming high-intensity session.
Below, you’ll find a series of dynamic warm-up exercises meticulously designed to activate your back muscles and prepare your body for action:
- Arm Swings: Start your warm-up with arm swings, engaging your shoulder and back muscles. Stand tall with your feet hip-width apart. Extend your arms out at shoulder level. Initiate controlled forward and backward swings with your arms. Experience the gentle stretch and activation in your back and shoulders.
- Cat-Cow Stretch: Transition to a tabletop position on your hands and knees. As you inhale, arch your back, lowering your belly towards the ground (cow pose). Upon exhaling, round your back and tuck your chin to your chest (cat pose). This fluid movement warms up your spine and engages your core and back muscles.
- Arm Circles: Stand with feet hip-width apart and extend your arms straight out to the sides. Gradually increase the size of your arm circles. This exercise promotes shoulder mobility and activates the muscles surrounding your upper back.
- Leg Swings: Hold onto a stable support like a wall. Swing one leg forward and backward in a controlled manner. This motion warms up your hip flexors, lower back, and glutes, setting the stage for the workout.
- Torso Twists: Stand with feet shoulder-width apart and hands on hips. Rotate your torso from side to side, allowing your upper body to twist while keeping your hips stable. This dynamic stretch targets your oblique muscles and the sides of your back.
- Shoulder Blade Contractions: Stand tall with relaxed arms at your sides. Squeeze your shoulder blades together, as if holding a pencil between them. Hold briefly before releasing. This exercise activates the muscles between your shoulder blades and contributes to better posture.
21 Back HIIT Sessions
Workout 1: Bent-Over Rows
Welcome to the inaugural stop on our exhilarating journey through the 21 Back HIIT Workouts.
Allow us to introduce the Bent-Over Rows – a formidable exercise targeting lats, rhomboids, and lower back muscles, bestowing upon you that sturdy and finely etched back you yearn for.
Step-by-Step Guide:
- Positioning: Begin with feet shoulder-width apart, holding a dumbbell in each hand, palms facing your thighs. Engage your core for stability.
- Hinging at the Hips: Keep your back straight as you hinge at the hips, slightly bending your knees. Lean your upper body forward while maintaining a neutral spine. Picture your torso parallel to the ground.
- Rowing Motion: Initiate by pulling the dumbbells toward your hips. Lead with your elbows, squeezing shoulder blades together at the peak. Maintain neutral wrists and proximity to the body.
- Full Contraction: Pause at the peak, feeling the engagement in your back muscles. Elbows should point upward.
- Lowering Phase: Lower dumbbells back down, arms extending fully while retaining a slight elbow bend.
- Repetitions: Aim for 10-12 reps per set, prioritizing controlled motion and proper form.
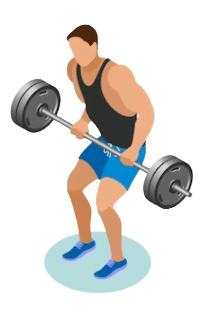
Workout 2: Lat Pull-Downs
Say hello to Lat Pull-Downs, an exercise meticulously crafted to focus on your lats and foster the coveted V-shaped back. Gear up to activate these muscles and elevate your back game.
Step-by-Step Guide:
- Equipment Setup: Identify a lat pull-down machine at your gym. Adjust the knee pad and select suitable resistance.
- Positioning: Sit with a straight back and raised chest. Grasp the bar with a wide overhand grip, hands positioned beyond shoulder width.
- Initiate the Movement: Engage your core and pull the bar down toward your chest while exhaling. Concentrate on lat activation over biceps engagement.
- Control the Descent: Gradually release the bar upwards, extending your arms. Maintain a slight arch in your back for spinal alignment.
- Mind the Range of Motion: Lower the bar just above your collarbone, avoiding shoulder strain.
- Repetition and Form: Execute reps while prioritizing proper form and steady tempo.
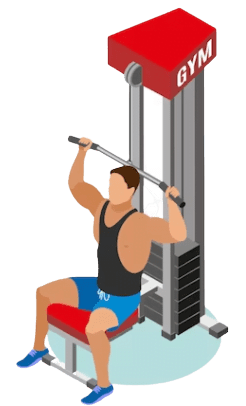
Workout 3: Renegade Rows
Embrace the challenge of Renegade Rows, a dynamic exercise that tests your core and engages multiple muscle groups simultaneously.
This exercise transcends mere weightlifting – it’s about control and comprehensive activation. Dive into the power of Renegade Rows.
Step-by-Step Guide:
- Initial Position: Start in a high plank, wrists beneath shoulders, forming a straight line from head to heels. Engage your core for stability.
- Dumbbell Setup: Position dumbbells shoulder-width apart. Grip the dumbbells with parallel weights.
- Rowing Motion: Inhale as you lift a dumbbell, pulling it towards your hip while maintaining proper form. Engage your back muscles, avoiding hip twisting.
- Maintain Stability: Keep hips level, akin to balancing a glass of water on your lower back.
- Lowering: Controlled lowering of the dumbbell while maintaining stability.
- Alternate Sides: Complete one side, then switch arms. Continue alternating.
Workout 4: Superman Pulls
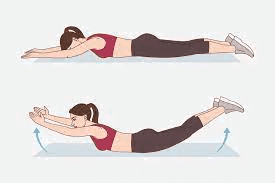
Unveil the power of “Superman Pulls” – an exercise that not only targets your back but also taps into dynamic movement and challenge.
Picture channeling your inner superhero as you infuse precision and vigor into each repetition.
Step-by-Step Guide:
- Starting Position: Begin face-down on an exercise mat, arms extended, and legs straight. Mimic Superman’s flight position.
- Lift and Pull: Inhale as you lift arms, chest, and legs, creating a gentle back arch while engaging the lower back.
- Squeeze and Hold: Squeeze glutes and engage back muscles at the peak, forming a “U” shape.
- Pulling Action: Exhale and pull arms back toward hips, as if tugging imaginary ropes.
- Extend and Lower: Gradually release pull, extend arms forward, and lower chest and legs.
Workout 5: Single-Arm Dumbbell Rows
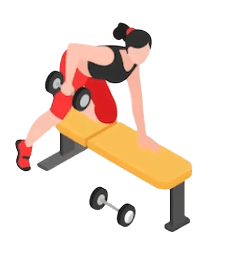
Single-Arm Dumbbell Rows – a precision move for lats, rhomboids, and traps, sculpting a potent and robust back. Master this exercise like a pro:
Single-Arm Dumbbell Rows Exercise:
- Targeted Muscles: Latissimus Dorsi, Rhomboids, Trapezius
- Equipment: Dumbbell
Step-by-Step Guide:
- Preparation: Grab an appropriate dumbbell and place it in front of you.
- Positioning: Stand with feet shoulder-width apart, hinge at hips, and grip the dumbbell. Support free hand on a stable surface.
- Engage Core: Maintain a stable spine with an engaged core.
- Rowing Motion: Retract the shoulder blade and pull the dumbbell toward the hip, engaging targeted muscles.
- Pulling Action: Keep the elbow close to the body while pulling, emphasizing back muscles.
- Peak Contraction: Feel the contraction at the top of the movement.
- Controlled Release: Lower dumbbell while extending arm.
Workout 6: Pull-Up Variations
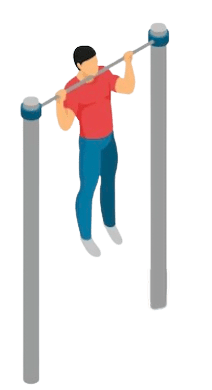
Elevate your Back HIIT with Pull-Up Variations, a set of power-packed moves for upper back sculpting.
From standard pull-ups to dynamic twists, these exercises cater to all levels, ensuring robust back muscle development.
Step-by-Step Guide:
- Approach with Confidence: Ensure the pull-up bar’s stability and grip.
- Grip Variation: Choose overhand, underhand, wide, or close grip.
- Initiate the Pull: Exhale and pull up, engaging back muscles.
- Control the Descent: Inhale while lowering, maintaining control.
- Repeat with Form: Prioritize proper form and range of motion.
- Modifications: Use resistance bands or negative reps for beginners.
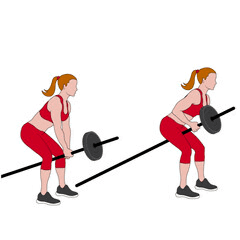
Workout 7: Deadlift High Pulls
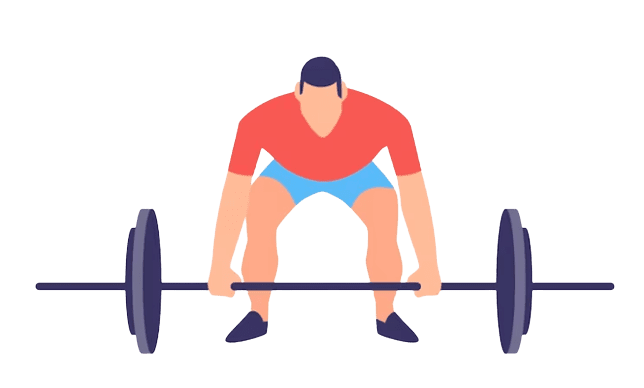
Deadlift High Pulls – an all-encompassing exercise targeting the back, core, shoulders, and lower body.
This movement embodies energy release, strength challenge, and empowerment.
Step-by-Step Guide:
- Setup: Hold weight with an overhand grip, feet hip-width apart.
- Starting Position: Hinge hips, bend knees, and maintain a neutral back.
- Deadlift Motion: Lower weight close to the body, back straight.
- Explosive Pull: Stand up explosively, pulling weight to chest.
- Shoulder Activation: Shrug shoulders at the top.
- Lowering: Control the descent, allowing hips to hinge back.
- Repeat: Perform recommended reps or time duration.
Workout 8: T-Bar Rows
T-Bar Rows – a quintessential back-building exercise for ultimate upper body strength.
For a commanding back, this exercise takes center stage. Master T-Bar Rows with finesse.
Step-by-Step Guide:
- Step 1: Setup: Position the T-Bar row machine and load weight. Stand with feet shoulder-width apart, knees bent, neutral spine.
- Step 2: Grip and Positioning: Overhand grip, hands wider than shoulders.
- Step 3: Pulling Motion: Exhale, pull the handlebar toward the midsection, engaging back.
- Step 4: Peak Contraction: Pause and squeeze shoulder blades.
- Step 5: Lowering: Inhale, lower the handlebar under control.
- Step 6: Sets and Reps: Execute sets with proper form.
Workout 9: Backward Medicine Ball Slams
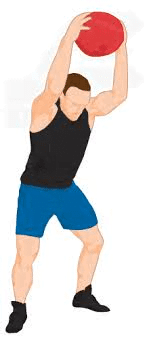
Embrace the explosive challenge of Backward Medicine Ball Slams – a release of energy, a testament to strength, and a salute to determination. Get ready to channel your inner dynamo as you slam that medicine ball with all you might.
Step-by-Step Guide:
- Choosing the Right Ball: Select a challenging yet manageable weight.
- Stance: Stand with feet shoulder-width apart, core engaged.
- Lift and Reach: Lift the ball overhead, arms extended.
- Engage Muscles: Slam ball behind you, pivoting at hips.
- Explosive Slam: Forcefully slam the ball, engaging the core.
- Recovery: Allow the ball to rebound and catch.
- Repeat: Find your rhythm and intensity.
Workout 10: Seated Cable Rows
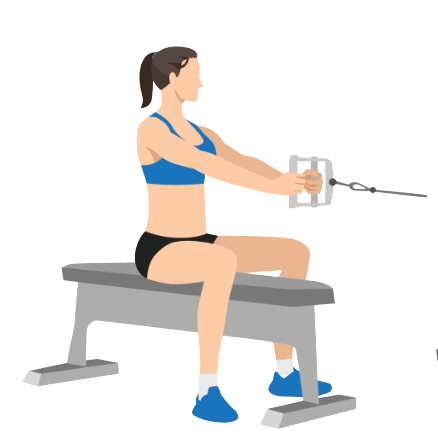
Seated Cable Rows – a classic yet transformative exercise for a sculpted back.
For strength and definition, embrace this exercise as a cornerstone of your routine. Master the form and intensity for ultimate results.
Step-by-Step Guide:
- Set Up: Find a cable row machine or use a resistance band.
- Positioning: Sit with back straight and chest up.
- Grip and Initiate: Overhand grip, engage the core.
- Rowing Motion: Pull the handlebar toward the midsection.
- Full Contraction: Squeeze shoulder blades.
- Release: Extend arms and control the motion.
- Repeat: Prioritize proper form and range of motion.
- Adjust: Gradually increase resistance.
Workout 11: Russian Twists with Medicine Ball
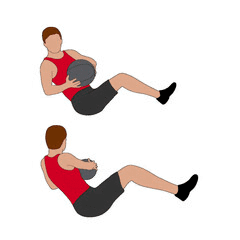
Russian Twists using a trusty medicine ball. This exercise not only targets your obliques but also engages your back muscles, making it a perfect addition to your Back HIIT routine.
Get ready to twist, engage, and feel the burn as you sculpt your midsection and back muscles.
Step-by-Step Guide:
Positioning:
- Sit on the floor with your knees bent and your feet flat on the ground. Lean back slightly, maintaining a straight back.
- Hold a medicine ball with both hands, keeping it close to your chest. Engage your core muscles.
Twist and Reach:
- Lift your feet slightly off the ground, balancing on your sit bones. This engages your core even more.
- Start twisting your torso to the right, bringing the medicine ball to the outside of your right hip. Feel the contraction in your oblique muscles.
Center Position:
- Bring the medicine ball back to the center, close to your chest. This completes one repetition.
Opposite Side:
- Now, twist your torso to the left, bringing the medicine ball to the outside of your left hip.
- Again, bring the medicine ball back to the center to complete the repetition.
Smooth and Controlled Movements:
- Perform the twists in a controlled manner, focusing on engaging your core and back muscles throughout the movement.
- Keep your back straight and avoid rounding your spine.
Breathing:
- Inhale as you center the medicine ball, and exhale as you twist and reach.
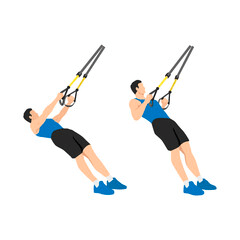
Workout 12: TRX Rows
Introducing TRX Rows. This exercise is a game-changer for your back, honing in on your lats, rhomboids, and upper back muscles.
It’s like granting your back a VIP invitation to a high-performance workout. Let’s delve into the details:
Step-by-Step Guide:
- Setup: Securely attach your TRX straps to a sturdy anchor point, such as a door frame or bar. Adjust the straps to chest level when standing straight, holding the handles. Step back, leaning slightly backward, creating a diagonal line from head to heels.
- Body Position: Begin with fully extended arms, relaxed shoulders, and engaged core. Feet hip-width apart, weight evenly distributed through your heels.
- Pulling Motion: Initiate by squeezing shoulder blades together. Draw your chest toward the handles, keeping elbows close to your sides. Imagine aiming to touch your chest to the handles. Maintain a tight core for stability.
- Peak Contraction: At the top, hands near ribcage, upper back muscles fully engaged. Hold momentarily to maximize muscle activation.
- Controlled Release: Gradually extend arms, returning to the starting position. Maintain strap tension during the descent. The controlled release phase is as important as the pull.
- Repetitions and Sets: Start with 10-12 reps per set, emphasizing proper form and controlled motion. Aim for 3-4 sets, allowing adequate rest between each set.
Workout 13: Reverse Flies
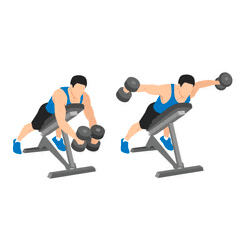
Today, we unveil the dynamic and potent Reverse Flies. Prepare to unfurl your wings and activate your back muscles in unprecedented ways.
Step-by-Step Guide:
- Set Up: Commence by securing a pair of dumbbells suited to your fitness level. Stand with feet hip-width apart and a slight knee bend. Grasp a dumbbell in each hand, palms facing each other, allowing arms to hang naturally in front of you.
- Hinge Forward: Initiate a hip hinge, slightly bending your torso. Maintain a straight back and engaged core. Your chest should angle comfortably toward the ground.
- Engage Your Back: Exhale and commence lifting both dumbbells outward in a sweeping arc. Visualize squeezing your shoulder blades together during the lift. Channel focus into your back muscles, especially the rear deltoids (muscles at the back of your shoulders).
- Control the Movement: Eschew momentum for lifting weights. Prioritize controlled and purposeful movement. Since the back muscles’ tension during the dumbbell elevation.
- Top Position: Pause briefly when your arms align parallel to the ground or slightly higher. Your body should mimic a “T” shape.
- Lower with Control: Inhale as you meticulously lower the dumbbells to the starting position. Uphold a straight back and engaged core throughout the exercise.
Workout 14: Face Pulls
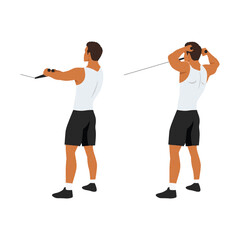
Face Pulls. Get ready to sculpt those muscles, boost your posture, and exude newfound confidence.
Step-by-Step Guide:
Step 1: Set Up
- Attach a rope handle to the high pulley of a cable machine.
- Adjust the weight to a manageable resistance level. You want to challenge yourself but also maintain proper form.
Step 2: Positioning
- Stand facing the cable machine and hold the rope handle with an overhand grip (palms facing down) at shoulder-width or slightly wider.
- Take a step back to create tension in the cable. Your feet should be about shoulder-width apart.
Step 3: Execution
- Begin by retracting your shoulder blades – think of pulling them back and down. This engages the muscles of your upper back.
- Keeping your elbows higher than your hands, start pulling the rope towards your face. Your goal is to bring the rope to the sides of your face, just outside your ears.
- As you pull, focus on squeezing your shoulder blades together and engaging your rear deltoids and upper back muscles.
- Hold the fully contracted position for a moment, feeling the muscles working.
- Slowly release the rope, allowing your arms to fully extend while maintaining control.
- Repeat for the recommended number of repetitions.
Workout 15: Kettlebell Swings
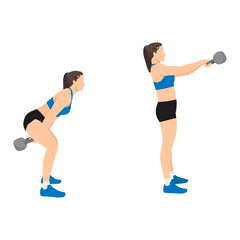
This explosive exercise not only incinerates calories but also sharpens your back muscles, leaving behind a gratifying burn and a revitalized spirit.
Let’s deconstruct it step by step, so you can swing your way to a more robust, sculpted back.
Step-by-Step Guide:
- Set Up: Position your kettlebell in front of you. Stand with feet slightly wider than shoulder-width, toes slightly outward. Maintain a soft knee bend.
- Grasp the Handle: Hinge at your hips, preserving a neutral spine. Grip the kettlebell handle with both hands, palms facing your body, and grip firmly.
- Hike the Kettlebell: Start the swing by hiking the kettlebell between your legs, as if hiking a football. Arms straight, engage the core and back for control.
- Explosive Thrust: In one powerful movement, thrust hips forward, swinging kettlebell ahead. Arms stay straight, hip momentum lifts the kettlebell to chest height. Visualize hips as a hinge, maintaining back alignment.
- Suspended Moment: At the swing’s apex, the kettlebell “floats” for an instant before gravity takes over. Engage the core for stability during this phase.
- Controlled Descent: As kettlebell descends, hinge hips back, guiding kettlebell between legs. Keep the core strong, avoid rounding your back.
- Repetition: Swing is rhythmic and continuous. As the kettlebell swings back, immediately thrust your hips forward for the next rep.
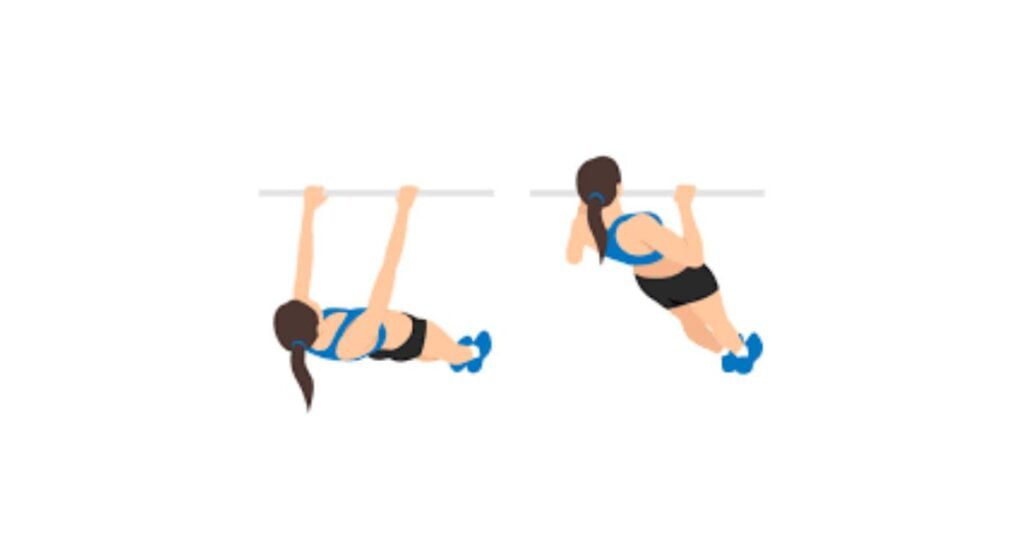
Workout 16: Inverted Rows
Ready to defy gravity and give your back muscles an exhilarating challenge? Inverted Rows are your golden ticket to a stronger, more sculpted upper back.
Get ready to embrace this unique exercise that puts your back muscles to the ultimate test.
Step-by-Step Guide:
Step 1: Set Up
- Find a sturdy horizontal bar or suspension trainer (like TRX).
- Adjust the bar or straps to about waist height.
- Lie on your back beneath the bar, holding it with an overhand grip (palms facing you). Your body should be straight from head to heels.
Step 2: Body Positioning
- Keep your feet flat on the ground and your knees bent.
- Engage your core and squeeze your glutes. This helps maintain a stable and aligned body position throughout the exercise.
Step 3: Rowing Motion
- Begin the movement by pulling your chest towards the bar or handles. Imagine squeezing your shoulder blades together.
- Keep your elbows close to your body as you pull. This targets the muscles of your upper back.
- Aim to bring your chest right below the bar or handles.
Step 4: Lowering Phase
- Slowly lower your body back to the starting position with control. Fully extend your arms while keeping tension in your back muscles.
Workout 17: Close-Grip Pull-Downs
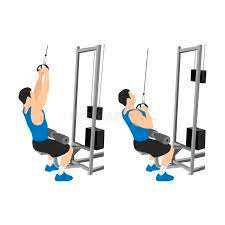
Introducing the Close-Grip Pull-Downs exercise – a dynamic maneuver that engages your lats, upper back, and biceps seamlessly.
This single motion packs a triple punch, making it the ultimate choice for sculpting and fortifying. Let’s delve into the intricacies of this transformative muscle-building routine:
Step-by-Step Guide:
Step 1: Set Up the Machine
- Locate the cable pull-down machine in your gym.
- Attach a close-grip handle to the cable.
- Adjust the knee pad to secure against your thighs, ensuring stability.
- Select a weight that challenges you yet maintains proper form.
Step 2: Assume the Position
- Sit on the machine with a straight back and engaged core.
- Grip the close-grip handle, palms facing you, hands shoulder-width apart.
- Position knees under the knee pad, feet flat on the floor.
- Relax shoulders and slightly elevate chest.
Step 3: Execute the Pull-Down
- Inhale, kick-start the motion by pulling the handle down toward your upper chest. Maintain elbows close to your sides.
- Focus on contracting shoulder blades as the handle reaches your chest, optimizing back muscle engagement.
- Exhale while gradually returning the handle to the initial position, maintaining controlled motion.
Step 4: Repeat and Enhance
- Aim for 3-4 sets of 10-12 repetitions, allowing your muscles to progress and strengthen.
- As you advance, incrementally increase the weight while upholding impeccable form.
Workout 18: Good Mornings
Good Mornings. This move is your ticket to a stronger, more resilient back and improved overall posture.
Step-by-Step Guide:
Step 1: Setup for Success
- Begin by placing a barbell on your upper back, across your shoulders.
- Stand with your feet shoulder-width apart, toes pointing slightly outward.
- Engage your core muscles to maintain a stable and neutral spine.
Step 2: Hip Hinge
- With a slight bend in your knees, initiate the movement by hinging at your hips.
- Imagine pushing your hips backward while maintaining a straight spine.
- Keep your chest up and your gaze forward throughout the movement.
Step 3: Lowering Phase
- Continue to hinge at your hips until your upper body is parallel to the ground.
- Feel the stretch in your hamstrings and the engagement in your glutes and lower back.
Step 4: Return to Starting Position
- Engage your glutes and hamstrings as you reverse the movement.
- Push your hips forward to stand up straight, maintaining control throughout.
Workout 19: Resistance Band Pull-Aparts
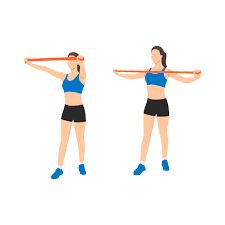
Welcome to an exercise designed to amplify strength and definition in your back: the Resistance Band Pull-Aparts.
This movement is akin to a covert agreement between you and your back muscles, declaring, “Let’s conquer this together.”
Step-by-Step Guide:
- Obtain a Band: Acquire a resistance band suited to your desired tension. Grasp it with both hands, palms facing downward, and maintain a grip slightly wider than shoulder-width.
- Stance: Assume an upright posture with feet positioned about hip-width apart. Keep your spine in a neutral alignment and engage your core muscles for stabilization.
- Starting Position: Extend your arms straight ahead at shoulder height. Ensure your hands align with your shoulders, generating tension in the resistance band.
- Pull Apart: While keeping your arms extended, initiate the movement by pulling the band apart, extending your hands outward to the sides. Envision elongating the band to its fullest extent. This motion effectively engages your back muscles, particularly the rear deltoids and upper back.
- Squeeze and Pause: Upon achieving a comfortable distance between your hands and activating your back muscles, contract your shoulder blades together. Experience the back tension as you hold this posture briefly.
- Controlled Return: Gradually release the band’s tension and guide your hands back to the initial front position. Maintain controlled movement throughout the entire range of motion.
- Repetition: Execute 12-15 repetitions of the Resistance Band Pull-Aparts. Emphasize the connection between your mind and muscles, perceiving your back muscles in action.
Workout 20: Hyperextensions
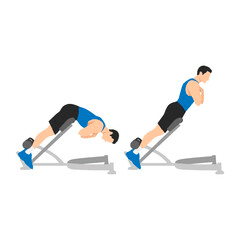
If you’ve yearned for an exercise targeting your lower back muscles while enhancing posture, your search ends here.
Hyperextensions step in to fortify your back, making it more robust and resilient than ever.
Step-by-Step Guide:
- Set Up: Begin by positioning yourself on a hyperextension bench. Adjust the bench so hips rest at the edge, enabling free upper body movement. Secure feet under the footpads.
- Prioritize Alignment: Gently place hands behind your head or cross them over your chest. Maintain neck alignment with spine – avoid tilting or looking upward. Ensure a neutral spine throughout the exercise.
- Engage Core: Before the movement, activate core muscles. This stabilizes your body, channeling effort toward your lower back.
- Lowering Phase: Hinge at hips, gradually lowering upper body toward the ground. Exercise control, shunning abrupt motions. As you descend, sense a stretch in your lower back.
- Lifting Phase: Employ lower back muscles to raise the upper body until aligned with hips. Movement should be measured and intentional.
- Exhale on Effort: Exhale during lifting, concentrating on exertion and lower back engagement. Inhale as you descend, upholding steady control.
- Prevent Overextension: Avoid hyperextending back at the movement’s apex. Aim for a straight line from head to heels.
- Reps and Sets: Commence with a manageable count of reps and sets, e.g., 3 sets of 12-15 reps. Gradually escalate as your strength advances.
Workout 21: Cool Down and Stretching
Now, it’s time to reward your hardworking muscles with a well-deserved cool-down and stretching session.
This phase provides a soothing embrace for your body, promoting flexibility, relieving muscle tension, and supporting recovery.
Let’s guide you through a sequence of post-workout stretches that will leave your back feeling rejuvenated and prepared for what lies ahead.
Child’s Pose:
- Begin by kneeling on the floor with your big toes touching and knees spread apart.
- Sit back on your heels and extend your arms in front of you.
- Lower your chest towards the ground while keeping your arms extended.
- Experience a gentle stretch along your back and shoulders.
- Hold this pose for 20-30 seconds while taking deep breaths.
Cat-Cow Stretch:
- Assume a tabletop position on your hands and knees.
- Inhale as you arch your back, lifting your tailbone and chin (cow pose).
- Exhale as you round your back, tucking your chin to your chest (cat pose).
- Flow between these two poses, synchronizing your movements with your breath for about 1 minute.
Seated Forward Fold:
- Sit on the ground with your legs extended in front of you.
- Hinge at your hips and reach your arms toward your feet.
- Maintain a straight back as you fold forward, feeling the stretch along your hamstrings and back.
- Hold this position for 20-30 seconds, focusing on deep breathing.
Thread the Needle:
- Begin in a tabletop position.
- Extend your right arm under your left arm, threading it through and lowering your right shoulder to the ground.
- Press your left palm into the ground, gently twisting your upper body.
- Experience the stretch in your upper back and shoulder.
- Hold for 20-30 seconds, then switch sides.
Standing Forward Fold with Clasped Hands:
- Stand with your feet hip-width apart.
- Clasp your hands behind your back, lifting them gently overhead.
- Hinge at your hips and fold forward, allowing your clasped hands to rise towards the ceiling.
- Feel the stretch in your shoulders, chest, and back.
- Hold this stretch for 20-30 seconds while maintaining deep breaths.
Seated Spinal Twist:
- Sit on the ground with your legs extended in front of you.
- Bend your right knee and cross it over your left leg, placing your right foot on the ground.
- Twist your torso to the right, positioning your left elbow on the outside of your right knee.
- Gradually deepen the twist with each exhale.
- Hold for 20-30 seconds, then switch sides.
- Engaging in this cool-down and stretching routine will provide your back and body with the care they deserve after a challenging workout. Please write in the English language.
Safety Tips and Considerations
Embarking on the invigorating journey of Back HIIT workouts is exciting, but safety and well-being should always be paramount.
Let’s ensure you’re armed with essential tips to keep your back strong and injury-free. We’re all about achieving gains, but never at the expense of your health.
Let’s sweat smart, work hard, and give your back the care and attention it deserves.
- Prioritize Proper Form: Form is the foundation of your success. Focus on executing exercises with impeccable technique rather than rushing through them. Maintain a neutral spine, engage your core, and avoid excessive arching of your back. This safeguards the right muscles and prevents strain.
- Gradual Progression: Building back strength is a gradual process. Begin with exercises that align with your current fitness level and incrementally intensify your workouts. Jumping into advanced movements prematurely can lead to injuries. Be patient and progress at a pace that suits your body.
- Listen to Your Body: Your body is your ultimate guide. If an exercise feels uncomfortable or causes any discomfort, cease immediately. The objective is safe and effective movement, not pain. Adjust your form, decrease resistance, or seek guidance from a fitness professional.
- Comprehensive Warm-Up: Prepare your muscles for intensity by starting with dynamic stretches and movements. A thorough warm-up readies your body for the workout and reduces the risk of injuries.
- Hydration is Key: Adequate hydration fuels your muscles and optimizes bodily functions. Sip water before, during, and after your workout to sustain performance and facilitate recovery.
- Rest and Recovery: Don’t underestimate the significance of rest. Muscles require time to heal and grow stronger. Incorporate regular rest days into your routine to prevent overtraining and provide your back with the necessary recovery.
- Choose Equipment Wisely: If your Back HIIT involves equipment, ensure it’s safe and well-maintained. Whether using dumbbells, resistance bands, or any other gear, proper equipment minimizes the risk of accidents.
- Cool Down and Stretch: Cooling down is as crucial as warming up. After your workout, engage in gentle stretches to ease muscle tension and enhance flexibility. Our ‘Cool Down and Stretching’ guide has you covered.
- Consult a Professional: If you’re new to exercise or have existing back conditions, consulting a fitness professional or healthcare provider before starting a new routine is essential. Their expertise will help tailor workouts to your specific requirements.
- Embrace Progress, Not Perfection: Every workout contributes to your journey, and progress comes in various forms. Avoid comparing yourself to others; concentrate on your advancement and celebrate each step of improvement.
Conclusion
Congratulations on completing your Back HIIT journey. The results are evident – a stronger, more sculpted back and a profound sense of achievement.
Through 21 meticulously targeted exercises, you’ve harnessed the potency of high-intensity intervals to reshape your fitness odyssey.
This expedition is not solely about physical advancement – it’s a testament to your dedication and determination.
Your back now epitomizes the fusion of sweat, resolve, and triumph. As you progress, infuse this newfound vigor into every facet of your existence.
Yet, this voyage is merely the inception. Keep challenging yourself, nurturing your body with mindfulness, and embracing the transformative ethos of Back HIIT.
Your back symbolizes resilience, laying the groundwork for the boundless potential that lies ahead.
So, maintain your focus, draw inspiration from within, and relentlessly push boundaries as you march toward a healthier, more vibrant version of yourself.